The Role of DIY Maintenance in Personal Finance
The jackets we wear daily often become cherished companions, bearing the marks of countless adventures. But what happens when these beloved garments show signs of wear, a tear, or a stubborn stain? The immediate thought might be replacement, which, in April 2026, can significantly impact our budgets and contribute to textile waste.
However, there's an empowering alternative: mending. This isn't just about fixing a hole; it's a practical strategy for personal finance mending that extends the life of our clothing, reduces waste, and boosts economic self-sufficiency. By embracing repair, we transform potential expenses into savings and develop valuable skills.
In this guide, we'll explore how patching a jacket can be a creative and financially savvy choice. We'll walk you through the essential tools, step-by-step instructions for various jacket types, and specialized techniques to ensure your repairs are both durable and stylish. Imagine the satisfaction of restoring a favorite piece, making it unique, and understanding the significant lifetime cost savings achieved through garment repair versus constant replacement.
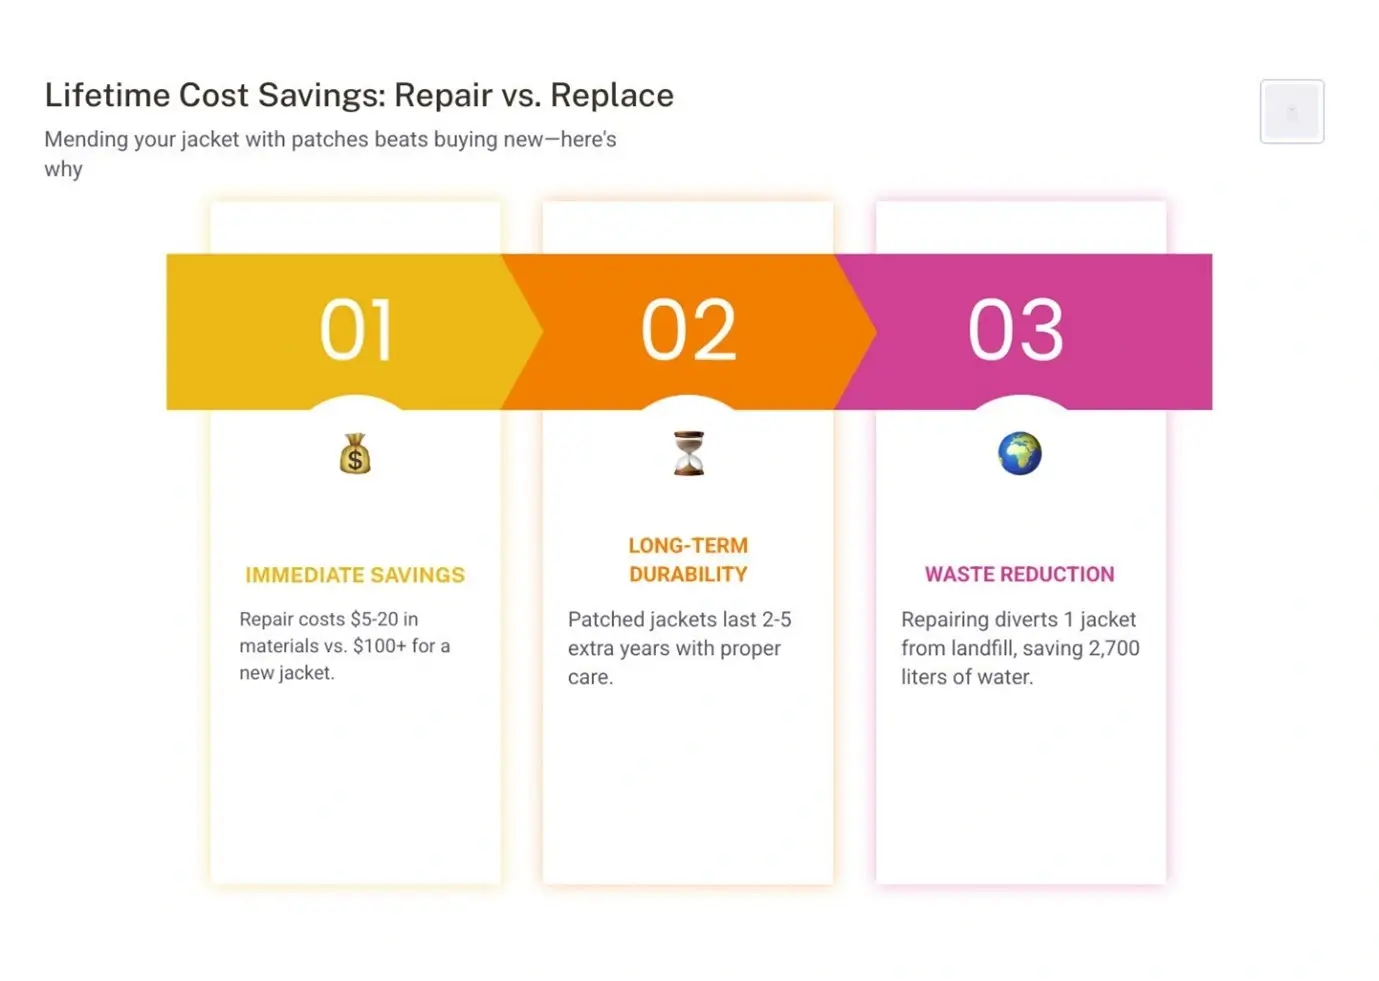
In an era dominated by fast fashion and planned obsolescence, the ability to repair and maintain our belongings is a powerful tool for economic empowerment. Mending a jacket with patches isn't merely a sartorial choice; it's a direct act of asset preservation that contributes to our overall financial well-being. By choosing to mend rather than replace, we engage in a form of cost-benefit analysis that invariably favors repair for its long-term savings and reduced environmental footprint. This approach aligns perfectly with principles of sound financial management, enabling us to optimize our budgets and allocate resources more effectively. For those interested in broader strategies for managing their money and making informed financial decisions, exploring resources on Personal finance mending can provide valuable insights into how everyday actions, like mending, contribute to a stronger economic future.
The practice of mending clothing has deep historical and cultural roots. Consider the Japanese tradition of boro, dating back to the Edo period, where textiles were meticulously patched and repaired over generations, creating garments with rich histories and incredible durability. Similarly, archaeological finds from 17th-century Scottish bogs reveal clothing that had been extensively repaired, demonstrating a universal human need to extend the life of valuable items. These examples highlight that mending is not a new trend but a time-honored skill that fosters resourcefulness and reduces dependency on constant consumption.
Building Wealth Through Personal Finance Mending
At its core, mending is a form of budget optimization. Every time we successfully repair a jacket, we avoid the expense of buying a new one. Over time, these small savings accumulate, freeing up funds for other financial goals, whether it’s building an emergency fund, investing, or paying down debt. Beyond the direct financial savings, mending cultivates valuable skills. Learning to sew, choose materials, and troubleshoot repairs enhances our general resourcefulness and problem-solving abilities – skills that are transferable across many aspects of life and contribute to our overall self-sufficiency. This hands-on approach to maintenance also helps us retain the value of our possessions, ensuring that our investments in quality garments continue to serve us for years.
Sustainable Consumption as a Personal Finance Pillar
The rise of "visible mending" in recent years has transformed repair from a hidden necessity into a celebrated art form. This approach embraces contrasting patches and imperfect stitches, turning repairs into decorative elements that tell a story. Visible mending isn't just about aesthetics; it's a powerful statement against the environmental impact of fast fashion. By extending the life of our clothing, we reduce textile waste, conserve resources, and lessen the demand for new production, supporting a more circular economy. This commitment to sustainable consumption becomes a pillar of personal finance, demonstrating that eco-conscious choices can lead to significant long-term savings and a more resilient financial future.
Essential Tools and Preparation for Jacket Restoration
Embarking on a jacket mending project requires a thoughtful selection of tools and meticulous preparation. Having the right equipment not only makes the process easier but also ensures a more durable and professional-looking repair.
Here’s a list of essential items for your mending kit:
- Heavy-duty needles: For hand-sewing, opt for sturdy needles that can penetrate thick fabrics like denim, canvas, or even leather. A denim needle (size 90/14) is often a good all-rounder for machine sewing.
- Strong thread: Polyester or nylon thread is recommended for its durability and resistance to wear and tear. Choose a color that either matches your jacket or the patch for a subtle look, or a contrasting color for visible mending.
- Thimble: Essential for protecting your fingers when pushing needles through dense materials.
- Sharp fabric scissors: Crucial for clean, precise cuts on both the jacket and the patch fabric.
- Tailor's chalk or fabric marker: For marking placement, cutting lines, and stitch guides.
- Rubbing alcohol: Useful for cleaning the area around the tear, especially before applying adhesive patches, to ensure optimal bonding.
- Fusible interfacing: For lightweight fabrics, a piece of fusible interfacing ironed onto the inside of the jacket can provide stability and prevent puckering when sewing.
- Pins or fabric clips: To hold the patch securely in place during placement and sewing.
- Iron and pressing cloth: For preparing the fabric, setting iron-on patches, and smoothing out finished repairs.
- Seam ripper: Handy for correcting mistakes or carefully removing old patches.
Choosing the right method for attaching your patch depends on the jacket's material, the patch type, and your desired durability. Here's a quick comparison:
Method Durability Skill Required Time Investment Suitable For Notes Hand-Sewing Excellent Moderate High All fabrics, intricate areas, decorative mending Offers precision and control, ideal for thick or delicate fabrics. Machine-Sewing Excellent Moderate Medium Most sturdy fabrics (denim, canvas), large patches Faster, stronger stitches, requires a suitable machine and needle. Adhesive/No-Sew Temporary-Good Low Low Waterproof fabrics, quick fixes, temporary repairs Best for nylon, ripstop; often needs reinforcement for longevity. Preparing the Fabric and Patch
Proper preparation is the cornerstone of a successful repair. Neglecting these steps can lead to a less durable fix or an unsightly finish.
- Clean the Surface: Always start by cleaning the area around the tear or hole on your jacket. For most fabrics, a gentle wash or spot cleaning will suffice. If using adhesive patches, clean the area with rubbing alcohol to remove oils and dirt, ensuring a strong bond.
- Iron Out Wrinkles: Press the area where the patch will be applied to create a smooth, flat surface. This prevents puckering and ensures the patch lies flat.
- Trim Frayed Edges: Carefully trim any loose threads or excessively frayed edges around the hole. For larger tears, you might slide the patch underneath the damaged area, in which case, trimming might be minimal.
- Measure and Cut the Patch: Cut your chosen patch material to a size that comfortably covers the damaged area, with at least a 1-inch overlap on all sides. For enhanced durability and to prevent fraying, fold and iron under a small seam allowance (about ¼ inch) around the edges of your patch. If using a patch with a raw edge (like a decorative embroidered patch), this step might not be necessary. Rounding the corners of patches, especially adhesive ones, can also help prevent them from lifting.
- Pin for Symmetry: Position the patch precisely over the damaged area. Use pins or fabric clips to secure it. Step back, look at it from different angles, and even take a quick photo with your phone to check for symmetry and balance. This step is crucial, as a crooked patch can be surprisingly noticeable.
- Use Cardboard Inserts: When hand or machine sewing, place a piece of cardboard or a sleeve board inside the jacket, directly beneath the area you're working on. This prevents you from accidentally sewing through both layers of the jacket, especially important for lined garments.
Step-by-Step Guide: How to Mend a Jacket with Patches
Once your jacket and patch are prepared, it's time to bring them together. Hand-sewing offers control and precision, making it ideal for various fabrics and intricate placements.
Here’s how to hand-sew a patch:
1) Thread the Needle: Cut a length of polyester or nylon thread (about 18-24 inches to avoid tangles). Thread your heavy-duty needle and double the thread, then tie the ends together with a secure double knot.
2) Start from the Underside: Begin stitching from the inside of the jacket, pushing the needle up through the jacket fabric and the edge of the patch. This hides your knot.
- Choose Your Stitch: Whip Stitch: A fast and simple stitch. Bring the needle up through the jacket and patch, then loop it over the edge of the patch and back down through the jacket, creating small diagonal stitches along the edge.
- Running Stitch: A subtle and simple stitch. Push the needle in and out of the fabric in a continuous line, creating small, even stitches. This can be used for a less visible attachment or to secure the patch to the underlying fabric.
- Blanket Stitch: A decorative and strong stitch, often used for patch edges. Bring the needle up through the fabric, then loop the thread under the needle point before pulling it through, creating a neat edge finish.
3) Stitch Evenly: Maintain consistent tension and spacing between your stitches. Take small, even stitches, especially on curves, to prevent puckering.
4) Backstitch for Security: When you reach the end of the patch or need extra reinforcement (e.g., at corners), make a few small backstitches to lock the thread in place.
5) Finish the Knot Inside: Once you've stitched all around the patch, bring your needle to the inside of the jacket. Make a small knot by looping the thread around a few existing stitches, then tie a double knot and trim any excess thread. This keeps the repair neat and prevents snagging.
Iron-On Application and Durability
Iron-on patches offer a quick and convenient way to attach a patch, but their durability is often a concern. They feature a heat-activated glue backing that adheres to fabric when heated.
To apply an iron-on patch:
- Prepare the Area: Ensure the jacket fabric is clean, dry, and wrinkle-free.
- Position the Patch: Place the patch in the desired location.
- Heat the Iron: Set your iron to a medium-high, dry heat setting (typically between 275-400°F or the cotton setting), ensuring there's no steam.
- Use a Pressing Cloth: Place a thin pressing cloth (like a clean cotton pillowcase or handkerchief) over the patch to protect it and the jacket fabric from direct heat.
- Press Firmly: Press the heated iron down onto the pressing cloth for 20-30 seconds, applying firm, even pressure. Avoid sliding the iron.
- Flip and Repeat: Turn the jacket inside out and press the back of the patched area for another 10-15 seconds to further activate the adhesive.
- Cool Completely: Allow the patch and jacket to cool completely before handling. The adhesive needs time to cure and bond fully.
While iron-on patches are easy, they are generally not considered a permanent solution, especially for items that are frequently washed or subjected to stress. The heat-activated glue can degrade over time, leading to the patch peeling or coming loose. For maximum longevity and durability, we strongly recommend sewing around the edges of an iron-on patch after it has been applied. This dual method combines the initial ease of placement with the lasting security of stitching.
It's crucial to avoid iron-on methods for certain materials, including waterproof or delicate synthetics (like some nylon jackets), leather, vinyl, and silk, as direct heat can damage or melt these fabrics. Always check the jacket's care label and the patch's instructions.
Specialized Techniques for Puffer, Leather, and Lined Fabrics
Mending jackets made from specialized materials like down puffers, leather, or those with complex linings requires specific techniques to ensure an effective and aesthetically pleasing repair.
Puffer Jackets
Repairing a down puffer jacket presents unique challenges, primarily due to the escaping feathers and the delicate ripstop nylon fabric.
- Feather Management: Before patching, gently push any exposed down feathers back into the baffle from the inside of the jacket. Using hemostats or a blunt pencil can help guide feathers back into place without excessive mess.
- Choosing the Patch: Lightweight ripstop nylon patches are ideal for down jackets. Gear repair tapes like Tenacious Tape are also excellent no-sew options, especially for field repairs.
- Circular Patches: For adhesive patches, cut them into a circular shape. This helps prevent corners from lifting, which is a common issue with square or rectangular patches on flexible fabrics.
- Application: For adhesive patches, ensure the area is clean and dry. Apply the patch smoothly, pressing firmly from the center outwards. Allow it to cure for at least 48 hours before washing. For larger tears or a more permanent fix, a hand-sewn patch using a ladder stitch (which creates an almost invisible seam) can be applied, but avoid stitching through the insulation if possible. If you must stitch, keep stitches shallow and only through the outer fabric layers.
- Repairing Large Tears: For significant damage, consider harvesting ripstop nylon from a donor garment (e.g., an old rain jacket or a thrifted vest) for a perfectly matched patch.
Managing Complex Materials and Placement
- Leather Jackets: Leather requires a different approach. Avoid using heat (no iron-on patches) as it can damage the material. For sewing, use a specialized leather needle (which has a wedge-shaped point designed to pierce leather without tearing) and strong polyester thread. A saddle stitch is a durable hand-sewing technique for leather. For adhesive repairs, use leather-specific glues or strong fabric adhesives designed for non-porous materials.
- Lined Jackets: Working with lined jackets can be tricky to avoid sewing through the inner lining.
- Use a Sleeve Board: A sleeve board or a rolled-up towel placed inside the sleeve or body can help separate the layers, allowing you to stitch only through the outer shell and the patch.
- Shallow Stitching: When hand-sewing, take very shallow passes with your needle, ensuring you only catch the outer fabric and the patch, not the lining.
- Knotting: Always knot your threads between the shell and the lining to keep the inside neat and prevent knots from showing or snagging.
- Clips: Fabric clips can be more effective than pins for holding layers apart without piercing the lining.
- Planning Patch Placement: Thoughtful placement is key for both aesthetics and durability.
- Balance: For multiple patches, lay them out and photograph them to ensure a balanced composition.
- Common Spots: Elbows, chest, back, and lower front are popular areas.
- Avoid Obstructions: Steer clear of seams, zippers, and functional areas that could impede movement or make sewing difficult. For instance, avoid patching directly over a pocket opening.
- Letterman Jackets: For a traditional look, the main letter typically goes on the left chest, with achievement patches stacked vertically on the sleeves, ensuring even spacing.
Post-Repair Care and Maintenance
To ensure your patched jacket lasts for years to come, proper aftercare is essential.
- Washing Inside Out: Always turn your patched jacket inside out before washing. This protects the patch edges and stitches from friction.
- Cold Water Cycles: Use cold water and a gentle cycle with mild detergent. Hot water can degrade adhesives and weaken stitches.
- Air Drying: Whenever possible, air dry your patched jacket. Hang it on a wide hanger to maintain its shape. High heat from tumble dryers can cause patches to peel, shrink, or damage delicate fabrics.
- Seasonal Inspections: Periodically inspect your patches for any signs of wear, loose threads, or lifting edges. Reinforce stitching as needed.
- Spot Cleaning: For minor dirt, spot clean the area around the patch rather than washing the entire jacket.
- Avoid Harsh Chemicals: Bleach or strong cleaning agents can damage patch materials and adhesives.
- Proper Storage: Store your jackets on wide hangers to prevent creases and protect the patch's shape.
Frequently Asked Questions about Personal Finance and Mending
How do I choose the right patch for different jacket types?
The ideal patch material varies significantly by jacket type to ensure both durability and aesthetic compatibility. For denim jackets, heavy-duty cotton, twill, or embroidered patches are excellent choices, often sewn on for maximum longevity. Down puffer jackets require lightweight, flexible materials like ripstop nylon or specialized adhesive gear repair tapes (e.g., Tenacious Tape) that won't compromise the jacket's insulation or waterproof properties. Leather jackets demand specialized leather or vinyl patches, which should be applied with leather-safe adhesives or sewn using specific leather needles to avoid damage. Always consider the jacket's primary function and material composition when selecting your patch.
Can I use no-sew methods like adhesives for permanent jacket repairs?
No-sew methods, such as fabric glues like Fabric Fusion or strong adhesive tapes like Tenacious Tape, are highly effective for specific scenarios. They are excellent for temporary field repairs on the go, or for materials where sewing is impractical, such as waterproof nylon or delicate synthetics that could be damaged by needle punctures. However, for areas subjected to high flex, frequent washing, or significant wear and tear, sewing remains the most durable and permanent solution. Adhesives can degrade over time with repeated washing and movement, making a sewn patch a more reliable long-term fix for most common jacket materials.
What are the most common mistakes to avoid when patching a jacket?
Several common pitfalls can undermine the success of a jacket patch. Firstly, puckering is a frequent issue, often caused by using too much tension in the thread or taking stitches that are too long on curves. Secondly, crooked placement is a common mistake that can be avoided by carefully pinning the patch, stepping back to assess its alignment, and even taking a quick photo before committing to sewing. Thirdly, using the wrong needle size for your fabric can lead to broken needles, damaged material, or difficulty in stitching. Finally, a significant error is failing to sew down the edges of iron-on patches. While iron-on patches offer initial convenience, their heat-activated glue often fails with washing, necessitating additional stitching for true durability. Always double-check your tools, preparation, and technique to ensure a lasting repair.
Conclusion
Embracing the art of mending jackets with patches is far more than a simple repair; it's a powerful statement of financial resilience and a creative act of storytelling through our clothing. By extending the life of our garments, we contribute to the longevity of goods, reduce waste, and actively participate in a more sustainable economy. This practical skill not only saves money but also fosters a deeper connection to our possessions, imbuing them with character and a unique history that fast fashion simply cannot replicate.
We hope this guide has empowered you with the knowledge and confidence to tackle your next jacket repair. As we navigate the economic landscape of April 2026, the ability to maintain and cherish our belongings stands as a testament to our resourcefulness and commitment to economic self-sufficiency. Appreciate your handwork and wear it proudly for years to come.
Business Outstanders brings you sharp insights on tech, business, entrepreneurship, law, crypto, and more. We uncover what’s next. Stay updated, sign up for our newsletter and be part of the future!